Multilingual, Multi Domain Site with MODX Revolution CMS
In this post I’m going to show you how to set up a multilingual, multi domain site with MODX Revolution CMS. There are several ways to do this. What I’m going to do in this tutorial is create separate pages inside of MODX using Contexts for every language and then map the domains accordingly.
www.example.com will lead you to the English context and www.example.de to the German context.
As a first step go to System/Contexts and create a new Context for your second language, in this example it’s de for German. I’m going to use the default web Context for the English page.
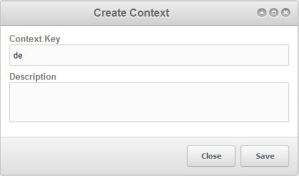 [1]
[1]
Next create a new Page for the Context by right clicking on de and selecting Quick Create/Document and write something language specific in it so you know that you are on the correct site later.
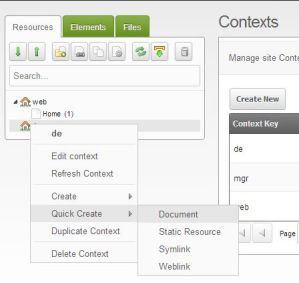 [2]
[2]
Now right click on the de Context and select Update Context.
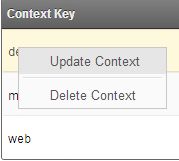 [3]
[3]
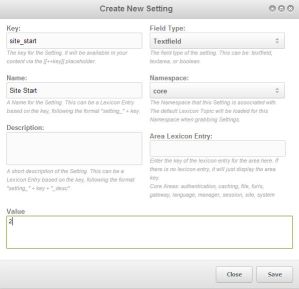
Create the following settings for the Context:
Key: site_start
Name: Site Start
Value: 2
2 is the ID of the start page for this Context.
Key: site_url
Name: Site URL
Value: http://example.de/
or http://www.example.de/ depending on which of the two you prefer.
Important: There is a little mistake in the image, you need a backslash at the end of the domain, else you might run into problems later on.
Key: cultureKey
Name: Culture Key
Value: de
 [4]
[4]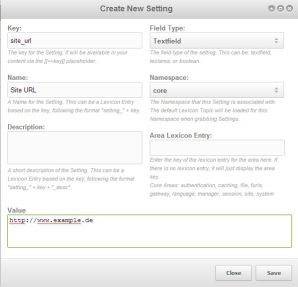 [5]
[6]
[5]
[6]
Do the same for the web Context with the corresponding values (1, example.com, en). You don’t necessarily have to set a site_start ID for the default Context web because that is set in the System/System Settings but I’d still do it for consistency.
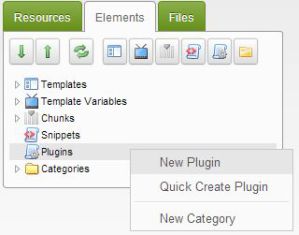
Once this is done you have to create a gateway plugin that redirects your visitors to the correct site. Select the Elements tab on the left, right-click on Plugins and select New Plugin.
 [7]
[7]
Name it whatever you like but I’d suggest gateway plugin. Now enter the following code with your domains:
<?php
if($modx->context->get('key') != "mgr"){
    //grab the current domain from the http_host option
    switch ($modx->getOption('http_host')) {
        case 'example.de':
        case 'www.example.de':
            $modx->switchContext('de');
            $modx->setOption('cultureKey', 'de');
            break;
        default:
            // Set the default language/context here
            $modx->switchContext('web');
            $modx->setOption('cultureKey', 'en');
            break;
    }
}
After that click on the System Events tab and select OnHandleRequest.
Now your domains should show the correct pages.
The last thing I’m going to show you is how to automatically generate the navigation and language switching menu.
To achieve this you have to install two extras. Go to System/Package Management and install the following plugins:
Wayfinder – This extra will generate the navigation.
Babel – This extra will create the language switching menu.
Don’t forget to install the extras after you’ve downloaded them.
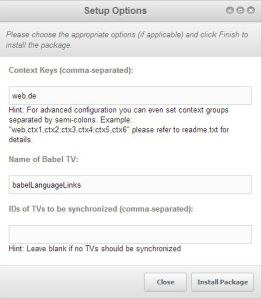
Insert your context names in the Setup Options popup from the Babel extra:
 [8]
[8]
Now edit the home pages of your Contexts, you will notice a new interface on the top right. Link all homepages with their respective IDs. In this example I put the ID of the German home page into the German (de) tab of the English home page and vice versa.
 [9]
[9]
Alright, just one more thing to do. Edit your template, you can find the default template by clicking on the Elements tab on the left and selecting Templates/BaseTemplate.
To show the navigation menu, all you need to do is add:
[[Wayfinder? &startId=`0`&level=`1`]]
To show the language switching menu add:
[[!BabelLinks]]
A complete example:
<!DOCTYPE html>
<html xmlns="http://www.w3.org/1999/xhtml">
<head>
<title>[[++site_name]] - [[*pagetitle]]</title>
<base href="[[++site_url]]" />
</head>
<body>
  <header>
    <nav>
      [[Wayfinder? &startId=`0`&level=`1`]]
    </nav>
  </header>
  <div id="language">
    <!-- Per default, Babel only includes <li> tags
    which are not XHTML compliant on thier own -->
    <ul>[[!BabelLinks]]</ul>
  </div>
  <main>
  [[*content]]
  </main>
</body>
</html>
I didn’t come up with all of this myself, there are several awesome people who have written tutorials on this topic. Here are a few of those, their instructions might differ slightly from mine:
- http://www.belafontecode.com/modx-revolution-hosting-multiple-domains/
- http://www.multilingual-modx.com/blog/2011/multilingual-websites-with-modx-and-babel.html
- http://www.multilingual-modx.com/blog/2011/multilingual-websites-with-modx-and-babel.html
- http://rtfm.modx.com/revolution/2.x/administering-your-site/contexts/using-one-gateway-plugin-to-manage-multiple-domains